Arduino-Communication Function

This article details the use of the Arduino's Communication function.
Arduino provides standard serial communication functions for easy serial communication.
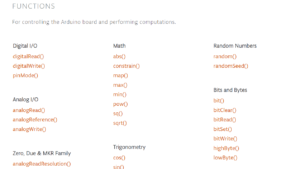
For other Arduino functions and libraries, please refer to the following article.
Communication Functions
| Functions | Parameters | Returns | Explanation |
|---|---|---|---|
| Serial.begin(unsigned long speed) | speed: Communication speed | None | Initializes serial communication |
| end() | None | None | Ends serial communication |
| int Serial.available() | None | The number of bytes available to read | Gets the number of bytes available for reading |
| int Serial.read() | None | 1Byte serial data | Reads 1Byte serial data |
| int Serial.peek() | None | 1Byte serial data | Reads 1Byte serial data without removing it from the buffer |
| Serial.flush() | None | None | Waits for the transmission of the serial data to complete |
| Serial.write(data) Serial.write(buf, len) | data: The value to send buf: The array to send len: The number of bytes | Bytes of data to be sent | Data transmission |
| Serial.print(val, format) | val: The value to print format: Base or Significant Digits | Bytes of data to be sent | Send string (no line feed) |
| Serial.println(val, format) | val: The value to print format: Base or Significant Digits | Bytes of data to be sent | Send string (with line feed) |
Serial.begin()/Initializes serial communication
- Function: Serial.begin(unsigned long speed)
- Parameter: speed⇒Communication speed
- Return: None
The Serial.begin() function initializes serial communication. The following communication speeds (bps) are set in the parameters.
- 300
- 1200
- 2400
- 4800
- 9600
- 14400
- 19200
- 28800
- 38400
- 57600
- 115200
end()/Ends serial communication
- Function: end()
- Parameter: None
- Return: None
The end() function terminates serial communication. By terminating serial communication, the shared pins PD0 and PD1 can be used as digital I/O.
Serial.available()/Gets the number of bytes available for reading
- Function: int Serial.available()
- Parameter: None
- Return: The number of bytes available to read
Serial.read()/Reads 1Byte serial data
- Function: int Serial.read()
- Parameter: None
- Return: 1Byte serial data
Serial.peek()/Reads 1Byte serial data without removing it from the buffer
- Function: int Serial.peek()
- Parameter: None
- Return: 1Byte serial data
Serial.flush()/Waits for the transmission of the serial data to complete
- Function: Serial.flush()
- Parameter: None
- Return: None
The Serial.flush() function waits for the completion of serial data transmission.
Serial.write()/Data transmission
- Function: Serial.write(data)
- : Serial.write(buf, len)
- Parameter: data⇒The value to send
- : buf⇒The array to send
- : len⇒The number of bytes
- Return: Bytes of data to be sent
The Serial.write() function sends character or array data from the Arduino board. When sending array data, the "data length" must be specified.
Serial.print()/Send string (no line feed)
- Function: Serial.print(val, format)
- Parameter: val⇒The value to print
- : format⇒Base or Significant Digits
- Return: Bytes of data to be sent
The Serial.print() function sends strings, numbers, variables, etc. from the Arduino board.
Serial.println()/Send string (with line feed)
- Function: Serial.println(val, format)
- Parameter: val⇒The value to print
- : format⇒Base or Significant Digits
- Return: Bytes of data to be sent
The Serial.println() function sends strings, numbers, variables, etc. from the Arduino board. In addition, a "new line" is appended to the end of the transmitted data.
How to use Serial Monitor
The serial monitor in the Arduino IDE can be used to send and receive data to and from the Arduino board.
The serial monitor is also used in the serial communication sample programs we will introduce, so be sure to keep it in mind.
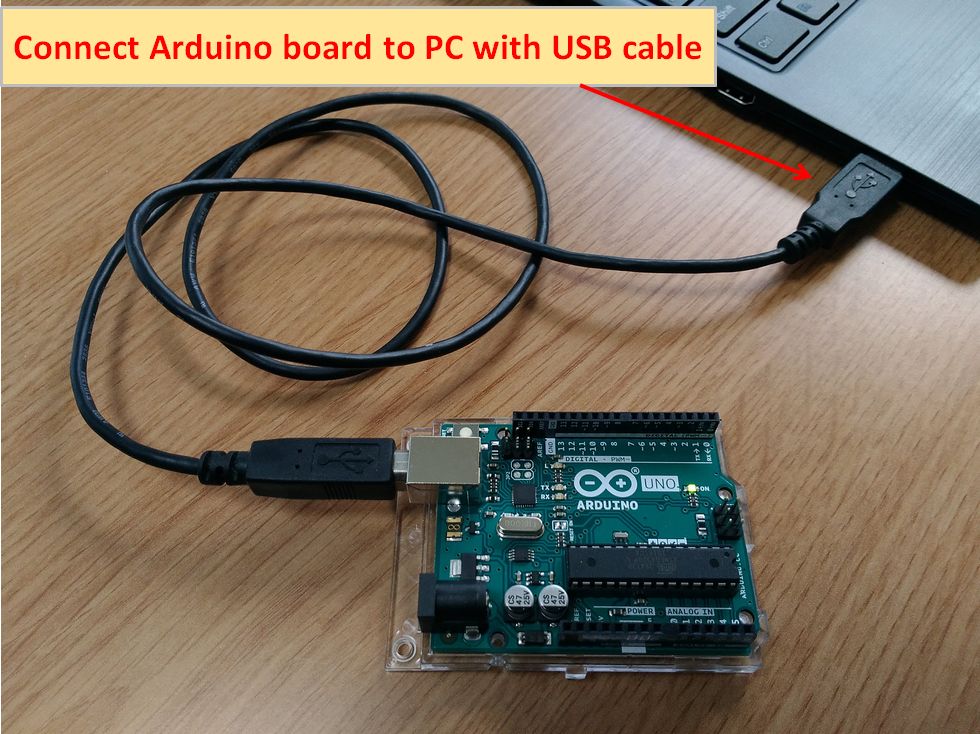
Connect the Arduino board(Arduino Uno) to the PC using the Arduino IDE with a USB cable.
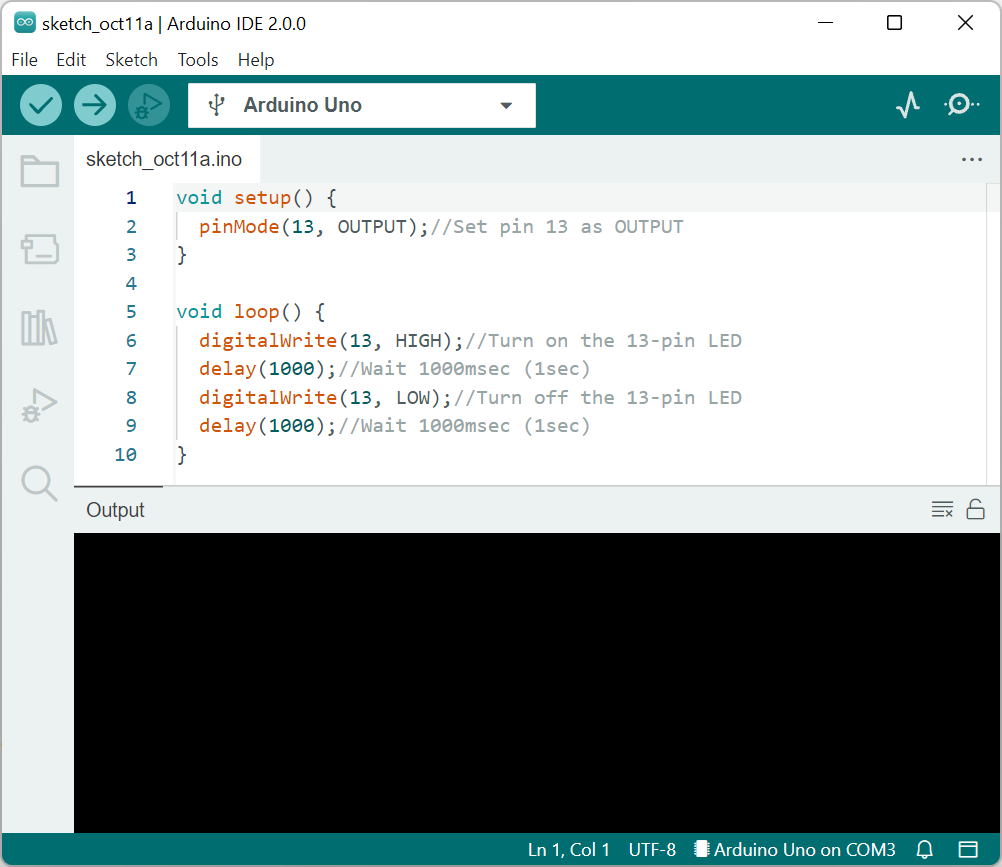
Start the Arduino IDE.
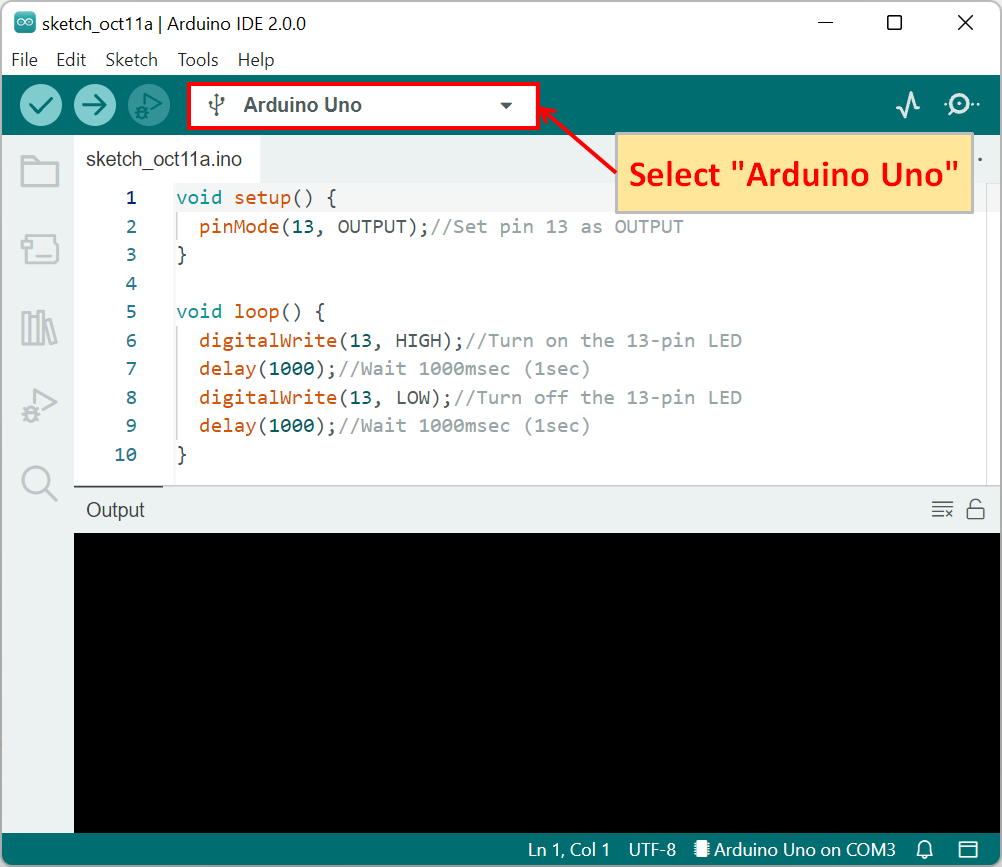
Select the Arduino board for writing the program. so select "Arduino Uno".
(The port is automatically selected.)
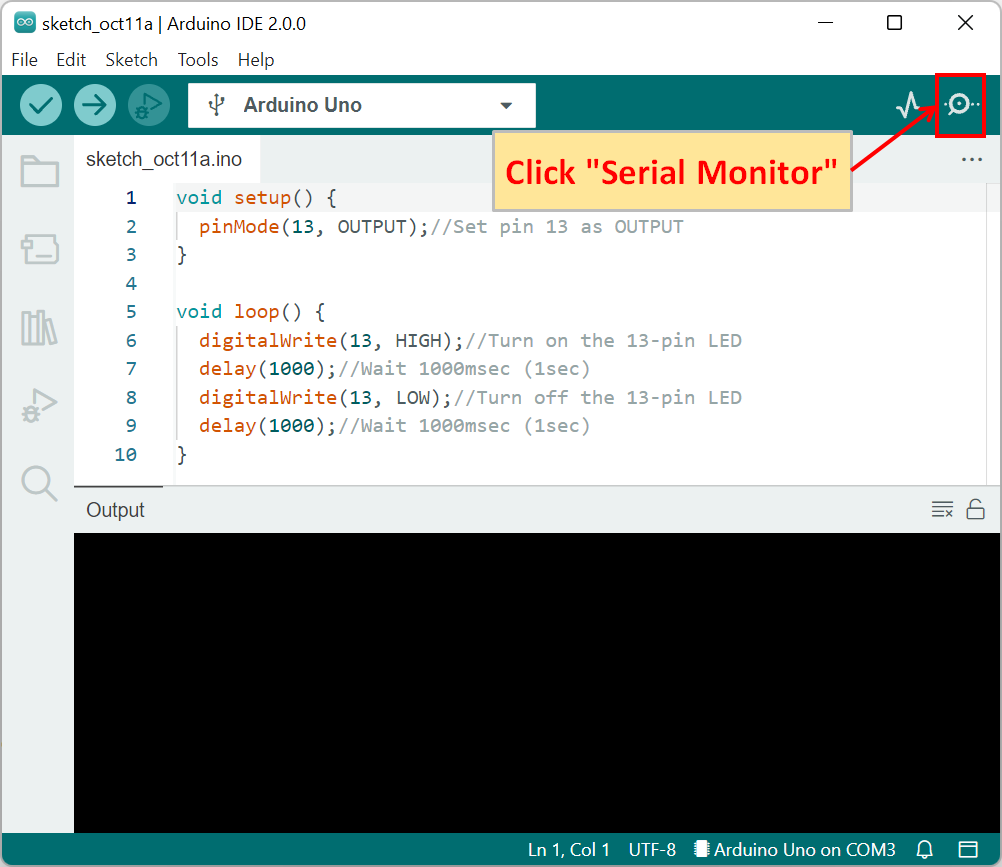
Click "Serial Monitor".
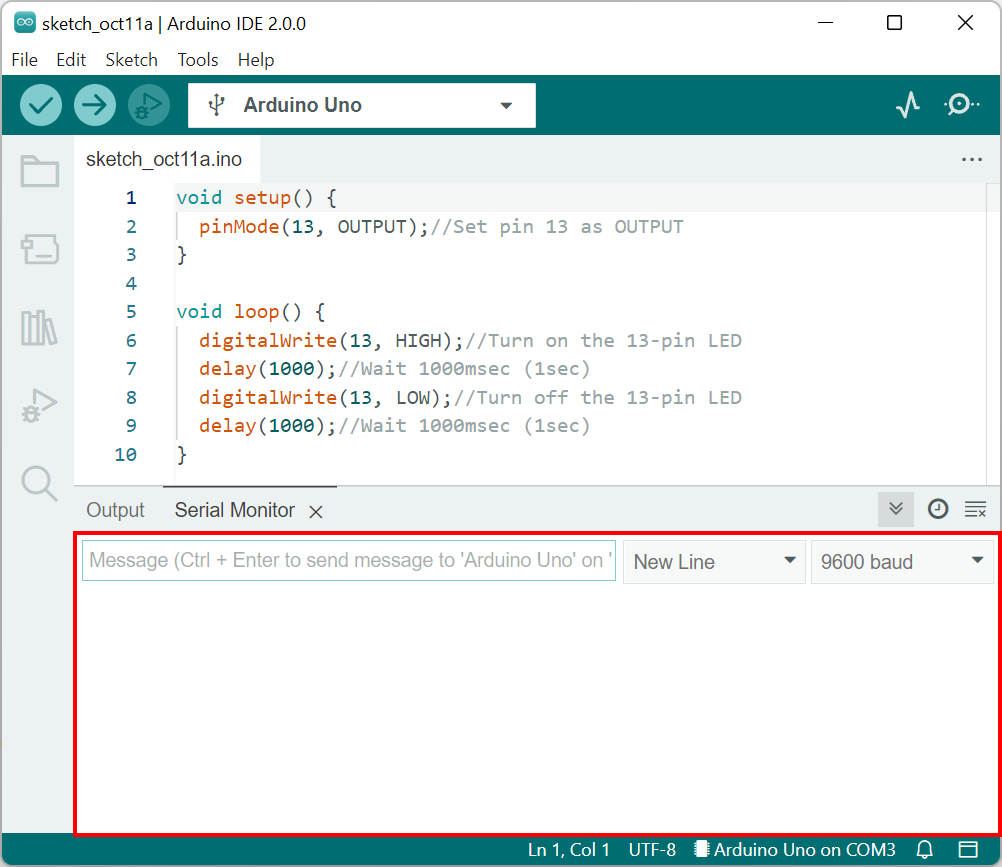
The serial monitor will appear. Type letters or numbers in the message field at the top of the serial monitor and press "Ctrl+Enter" on the keyboard to send data to the Arduino board.
Sample Programs (Sample Sketches)
- Arduino Uno
- USB Cable
- PC(For Program Writing and Serial Monitor)
Here are some sample programs (sample sketches) for serial communication.
Arduino provides standard functions for serial communication, which enables communication between PC and Arduino board and between Arduino board and Arduino board.
Serial.println()/Send string (with line feed)
void setup() {
  Serial.begin(9600);//Initialize serial communication at 9600bps
}

void loop() {
  Serial.println("Arduino!");//Send string "Arduino!", New line
  Serial.println(4649);//Send number "4649", New line
  delay(1000);//Wait 1sec (1000msec)
} Arduino!
4649
Arduino!
4649
Arduino!
4649
Arduino!
4649
Arduino!
4649
The sample program sends and newlines strings and numbers in ASCII code by the Serial.println() function. Strings are converted as is, and numbers are converted to ASCII characters.
void setup() {
  Serial.begin(9600);//Initialize serial communication at 9600bps
}

void loop() {
  Serial.println(4649, BIN);//Send number "4649" in binary, New line
  Serial.println(4649, OCT);//Send number "4649" in octal, New line
  Serial.println(4649, DEC);//Send number "4649" in decimal, New line
  Serial.println(4649, HEX);//Send number "4649" in hexadecimal, New line
  delay(1000);//Wait 1sec (1000msec)
}1100101001
11051
4649
1229
1100101001
11051
4649
1229
The sample program sends the data in binary, octal, decimal, or hexadecimal by specifying the format by the Serial.println() function.
Serial.print()/Send string (no line feed)
void setup() {
  Serial.begin(9600);//Initialize serial communication at 9600bps
}

void loop() {
  Serial.print("Arduino!");//Send string "Arduino!", New line
  Serial.print(4649);//Send number "4649"
  delay(1000);//Wait 1sec (1000msec)
}Arduino!4649Arduino!4649Arduino!4649Arduino!4649Arduino!4649
The sample program sends strings and numbers in ASCII code by the Serial.print() function. Strings are converted as they are, and numbers are converted to ASCII code.
(Unlike the Serial.print() function, the Serial.println() function does not create a new line.)
void setup() {
  Serial.begin(9600);//Initialize serial communication at 9600bps
}

void loop() {
  Serial.print(4649, BIN);//Send number "4649" in binary
  Serial.print(4649, OCT);//Send number "4649" in octal
  Serial.print(4649, DEC);//Send number "4649" in decimal
  Serial.print(4649, HEX);//Send number "4649" in hexadecimal
  delay(1000);//Wait 1sec (1000msec)
}1100101001110514649122911001010011105146491229
The sample program sends the data in binary, octal, decimal, or hexadecimal by specifying the format by the Serial.print() function.
(Unlike the Serial.print() function, the Serial.println() function does not create a new line.)
Serial.write()/Data transmission
void setup() {
  Serial.begin(9600);//Initialize serial communication at 9600bps
}

void loop() {
  Serial.write(2);//ASCII Code: STX (Start of Text)
  Serial.write(50);//ASCII Code: 2
  delay(1000);//Wait 1sec (1000msec)
}□2□2□2□2□2
The sample program sends the data as it is, as a numerical value, by the Serial.write() function. Therefore, '2' corresponds to STX (text start) in ASCII code, so '□' is displayed as a garbled character, and '50' corresponds to ASCII code, so '2' is displayed.
Serial.available()/Gets the number of bytes available for reading
void setup() {
  Serial.begin(9600);//Initialize serial communication at 9600bps
}

void loop() {
  if(Serial.available() > 0)//Executed if the number of bytes received is greater than 0
  {
    Serial.println("OK!");//Send string "OK!", New line
    delay(1000);//Wait 1sec (1000msec)
  }
}OK!
OK!
OK!
OK!
OK!
OK!
OK!
OK!
OK!
OK!
The sample program checks the number of Bytes of data received by the Serial.available() function. If serial communication is not available, "-1" is returned.
Therefore, in this sample program, when some data is sent from the serial monitor, "OK!" is displayed on the serial monitor.
Serial.read()/Reads 1Byte serial data
void setup() {
  Serial.begin(9600);//Initialize serial communication at 9600bps
}

void loop() {
  char data;
  if(Serial.available() > 0)//Executed if the number of bytes received is greater than 0
  {
    data = Serial.read();//Return 1Byte read value to data, Move read position
    Serial.println(data);//Send "data", New line
    delay(1000);//Wait 1sec (1000msec)
  }
}A
r
d
u
i
n
o
!
When the sample program sends "Arduino!" from the serial monitor, Serial.read() function reads 1Byte at a time and displays it on the serial monitor.
Serial.peek()/Reads 1Byte serial data without removing it from the buffer
void setup() {
  Serial.begin(9600);//Initialize serial communication at 9600bps
}

void loop() {
  char data;
  if(Serial.available() > 0)//Executed if the number of bytes received is greater than 0
  {
    data = Serial.peek();//Return 1Byte read value to data
    Serial.println(data);//Send "data", New line
    delay(1000);//Wait 1sec (1000msec)
  }
}A
A
A
A
A
A
A
A
A
A
Unlike the Serial.read() function, the Serial.peek() function does not move the read position after reading 1Byte.
Therefore, the sample program continues to display only the initial "A" even when "Arduino!" is sent from the serial monitor.